Showing posts with label PC. Show all posts

Startupizer (MAC USERS)


Startupizer: Boot Faster, Get to Work Quicker!
Being productive is all about being efficient, and restarting your computer is always a process that steals precious minutes from your life. If only there was a way to have a fine level of control over this frustrating task…
That’s the concept behind Startupizer, a new app available at the Mac App Store. If you’re anything like me, you have a few different extensions that all load up prior to the machine actually being usable.
Startupizer lets you tweak your startup settings so that you decide what opens when, making boot times substantially faster. As usual, there’s more to it, so let’s take a moment  and delve into Startupizer and what it does after the break.

The Example

On my MacBook Pro, I have several apps that load up with each boot. They are: Text Expander, SizeUp, Dropbox, smcFanControl, ForeverSave, iStat, Alfred and BusyCal.
I have to wait for each one to load up whenever I restart the computer, which can easily take a few minutes away from my day. This becomes particularly frustrating when I’m in a hurry, because there’s really no way to stop the process.
Startupizer begins with a startup screen telling you how the app works.

The Fix

In simple terms, Startupizer lets you pick and choose what apps start up with your computer depending on certain criteria which you choose. You could strip down all of your extensions by holding down a key during startup, for example, or have only certain apps launch during certain parts of the day.
This makes it easy for you to pick and choose how your computer operates, and keeps you operating at peak efficiency. So how does it work in practice?

How It Works

When you load Startupizer for the first time, you’re presented with the screen above. By allowing Startupizer to essentially take control of your login items, you’re allowing the app to control how everything works, thus giving you the ability to selectively choose what happens when. Next, you’re presented with this screen:
The Startupizer startup list.
Here, all of your login items are displayed in a list, and next to each one is a menu allowing you to choose how it works. For example, you can set the program to only open up certain utilities if you hold down the option key.
You can also choose if the app is hidden or shown on startup, which cuts back on annoying windows popping up every time you have to restart.

Time Scheduling

Even better though, is the option to schedule things based on dates and times. Let’s say that you shut down your laptop at home every Sunday night, and fire it back up again at your office come 9 am on Monday.
With Startupizer, you can select when the apps turn on with startup. This lets you truly schedule your work and home time, and cuts down on bits between loading.
Going to work? Schedule your apps.
Ultimately though, what makes this app functional is being able to pick and choose how you want things to work. You can have multiple criteria for each one, too.
So let’s say you want Cinch to open up (a) during work hours, or (b) if you hold down the option key. No problem here, because you can choose both if you like, avoiding Sophie’s Choicedecisions in the process.
Another great option is allowing Startupizer to work when waking up from sleep mode as well.
Choose how you want your apps to open - or not open.

Is It Worth It?

This is one of those apps that leaves me a bit torn. It’s a piece of software that you spend about 30 minutes with once, then it works silently in the background for you to forget about. It sounds ridiculous to say, but $8.99 seems steep to me for some reason for the software, and I don’t have any real justification for that other than a gut feeling.
More importantly, this app only becomes particularly useful if you frequently restart your computer. Yes, it can be used when waking up from sleep but is that so important? I know that I only restart my MacBook Pro when I absolutely have to, which is rare. I just don’t use my computer that way.
But I do know people who shut down their Macs religiously, then always wait through all of those apps loading up. If you’re that person, then Startupizer is going to be your new best friend.
Startupizer isn’t for everyone, but performs a crucial function for those that need it. All in all, this is one utility that’s worth the look, even if you’re not sure if you need it.

Source : mac.appstrom.net

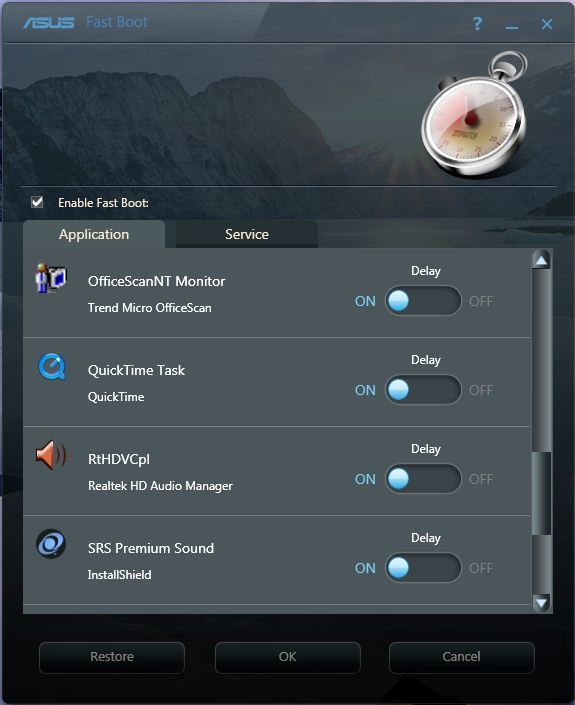
Windows 7 fast bootng software

The Asus FastBoot software reduces Microsoft Windows 7 32-bit/64-bit boot time. BIOS and third-party applications to decrease boot time with this software. Asus FastBoot is available for all personal computers and laptops with 32-bit or 64-bit Microsoft Windows 7 installed.Main window

download from ===> http://goo.gl/u96lj

Monitor Off Utility 1.0


Do you ever wish you could put your monitor into standby exactly when you want to? Now you can tell your monitor to immediately go into energy saving mode with the click of a button. Monitor Off Utility is a free program that allows you to take control of your monitors built-in energy saving features. Morover, you will have the possibility to configure your own customized keyboard shortcuts and to create a shortcut on your desktop or system tray.

The utility supports multiple monitors and is very flexible. It even allows you to use a command line interface if you want to incorporate the utility into your own scripts.
Here are some key features of "Monitor Off Utility":

Stand-Alone Version:
· You can download a stand-alone version of the program that you can run off your USB flash drive without installing it.

Adjustable Delay:
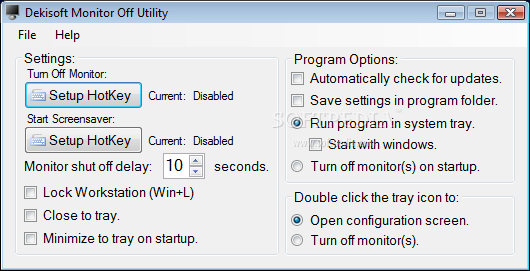
· Adjust the number of seconds the program waits before shutting off the monitors after the user initiates a monitor power off. During this delay period the operation may be cancelled.

Screen Saver Activation:
· This program will also allow you to activate your screen saver at will.

Lock Workstation:
· If you would like, the program can automatically lock your workstation before turning off the monitor(s).

HotKeys:
· You can configure a custom HotKey to turn off your monitor(s) or to start your screensaver.

Tray Access:
· You can quickly turn off your monitor(s) from the system tray.
Requirements:

· .NET Framework 2.0
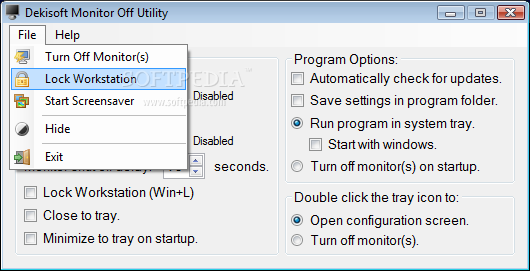
Monitor Off Utility screenshot 2 - This menu will offer you the possibility to easily launch the screensaver or to lock your computerMonitor Off Utility screenshot 1 - This is the main window of Monitor Off Utility where you can create the configuration you prefer

Download From ===> http://goo.gl/v9xor

Source: softpedia.com

YouTube Snake Game


YouTube provides streaming video. You can find variety of video based on your interests. Usually we wait for the video to load on the YouTube. But have you ever thought that you can do something innovative while waiting for your favorite video to stream? YouTube videos comes with hidden snake game.
Snake game is one of the most basic and simple game that is available in almost all cellphones. All you have to do is eat your food without touching the tail of the snake.
Screenshot shows hidden snake game embedded in all YouTube videos (Google rocks). You can play snake game in almost any video played on YouTube (personally, I was able to play game in few videos only).
play youtube snake game

How To Play Snake Game In YouTube Video

  1. Open any YouTube video. Let us take this as an example.
  2. When streaming starts. Hold left button of mouse + Left arrow on keyboard + Top arrow on keyboard.
  3. Once the game starts you can change the direction from keyboard arrow.
  4. Check out the screenshot of Snake game. Kindly try the video with dark background as it will be visible to you.
If you liked this post you might want to check out the tip to get your YouTube videos into 3D. Do drop in your comments about more tips and tricks with YouTube.

KMPlayer to convert 2D videos to 3D videos


Last month, a new version of KMPlayer was released and boy, did they change it! The new release is totally unlike any of it’s previous incarnations. Even though the version number is a minor bump from 3.1 to 3.2, it constitutes a major release as it includes several new features such as video and music library, 3D video playback, integration with online streaming services, a spanking new look and soon to be introduced app store.
First, let us see how the new KMPlayer looks like.
kmplayer
What you see above is not a simple video player but almost a media center. The column at the middle gives you access to various video streaming services such as K-POP, Viki, EveryonTV and 3D Movie Plus. You may not have heard of these names but they are popular among Korean Internet users. KMPlayer is developed and maintained by the Korean streaming video company PandoraTV which acquired the video player in 2008. So the preference for EveryonTV over YouTube or Hulu is natural.
On the right-column is the video and music library. You add the directories where your music and video is located and KMPlayer will automatically add them to the library. The lack of a search tool however makes it difficult find whatever you are looking for, especially if you have a large collection.
kmplayer2
The most exciting new feature is 3D video playback.
Playing 3D videos require a special video player because 3D videos contain two video streams. If you download a 3D video from YouTube and try to play it in a normal video player, you will see two videos playing side by side, such as the one below.
non-3d
But in KMPlayer you will see it in anaglyph 3D.
3d-video-kmplayer
The 3D mode is controlled by the 3D button you see in the toolbar. Originally, the video will load like in a normal player – two videos side by side. But once you click the 3D button, the video will magically convert into 3D. You can change the 3D mode from 2-color anaglyph to interlaced 3D, if you have 3D monitors and polarized 3D glasses such as those available with LG Cinema 3D TVs or even ones used in movie theatres. Interlaced 3D videos retain image quality and color reproduction which suffer in anaglyphic mode.
You can even change the anaglyph color depending on the color of your glasses, from Red/Cyan to Red/Blue or Red/Green etc. Depending on the source video you can also change the 3D from left/right to up/down.
3d-controls-kmplayer
KMPlayer v3.2 also supports Intel’s Wireless Display technology that can wirelessly connect a WiDi enabled computer or laptop to an HDTV or monitor through an adapter box that plugs into the HDMI port of any display. I’m not sure where KMPlayer fits into the equation, but support for Intel’s WiDi is reportedly a feature.
At it’s core KMPlayer is still an awesome video player. Plenty of support for video and audio file formats and subtitles. It provides both internal and external filters with connections to splitters, decoders, audio/video transform filters. The player can set many audio and video effects, slow down or increase playback speed, select parts of a video as favorites, do various A-B repeats, remap the keys of remote interface for HTPC including overlay screen controls, and change a skin dynamically depending on a media type playing. KMP is completely customizable thanks to a wide selection of skins and color schemes, as well extensive the configuration options

Download it from ===> http://goo.gl/aMuTF

Source : trickday.com

TRANSFORM WINDOWS 7 TO IPHONE


Step 1.First Check Your Operating system

Your Operating system 32bit or 64bit
To Check Right Click On  Computer Icon Then Go To Properties 


Then Check Your Architecture And Windows Edition Ultimate Or which Edition See Pic Below


If Your Edition is Win 7 starter Or home basic download This patch here then Click okk to Install It if not install Your system
to get Aero theme


To remove this Aero patch Click exe file if already Install your system click ok to remove It


I Highlighted 64 bit Operating System You Will Check Here
What Is your System Type 64 Bit Or 32bit


Step 2. Extract The Iphone Transformation Pack 


Step 3.If your O.S 32 Bit then Locate The folder 32 Bit user Otherwise If you are having 64 bit then locate the Folder 64 Bit User


Step 4.Click On Setup then Click Next See below


Step 5. Click I Accept an agreement then again Next


Step 6.Then Click on Custom Installation then Uncheck Options See Below


Step 7.Then Again Click On Install See Below


Step 8. Then Installation Will Be Continue


Step 9. Click On Reboot now then Click On finish


Step 10 After Uninstall if its happens See below

Step 11 Then Click On Properties as ashown your above picture

Step 12.Then Change The Taskbar location on Screen top to Bottom then Click okk


ScreenShots Of Iphone Transformation pack

Download torrent link from ===> http://goo.gl/XDi3G


Source : audi-a4-uploader.blogspot.in/


18 secret tricks and shortcuts in Windows 7


Here is a first collection of tips and tricks related to Windows 7, complete with a key combination:

In Windows 7 you can dock windows by dragging the right or left side of the desktop.Operation that can run faster through the following combinations:
Win + sn and Win + Right Arrow
Win + Up Arrow and Win + Down Arrow to minimize and maximize the current window
Win + Shift + Up Arrow and Win + Shift + Down Arrow maximizes and restores the vertical size

If you want to display your desktop on an external monitor or projector, simply press the key combination Win + P , or start the application displayswitch.exe . You will be presented a screen like the one pictured above.

To highlight the current window, hide all other currently open press Win + Home .
Win + Shift + Sn Arrow and Win + Shift + Right Arrow to move windows from one monitor to another.

To open a DOS window from its current location, simply press Shift while selecting an item from the context menu.

Some of the backgrounds available are contextualized according to the country, others are in a hidden folder. To view them you all just go to C: \ Windows \ Globalization \ MCT.

You can record the actions you perform within the operating system through the program psr.exe also found that in the Control Panel under "Record steps to reproduce a problem".

Windows 7 will find the character of Gabriola , a beautiful decorative font.

If Explorer 8 seems too heavy on startup, then you have to remove some addons. Go to the Tools menu, select Manage Add-ons and try to remove some plugin.

If you can, use a USB stick (you only need 4 GB) to install Windows 7, it is really fast, much more than using a DVD. FAT32 format it and copy the ISO to install with the following command xcopy e: \ f: \ / e / f .

If you miss the toolbar Quick Launch in the task bar, ripristinatela writing the following location % userprofile% \ AppData \ Roaming \ Microsoft \ Internet Explorer \ Quick Launch window to add new toolbar.

With the command Win + Space to operate the ' aero peek , to see all the icons and gadgets installed on your desktop.

Ctrl + Shift will allow you to run a program as an administrator directly.

If you need to open an instance of an application you are using, not resort to the Start menu ... click the icon in the taskbar of the program by pressing Shift .

To start directly on the screen of our computer's file manager to change the target of the link explorer % SystemRoot% \ explorer.exe / root,:: {20D04FE0-3AEA-1069-A2D8-08002B30309D}

When you press double-click on a CD or DVD image files (eg. ISO) will open a window Burning ISO that will allow you to proceed with burning

Now you can optimize the display of text cttune.exe and color calibration with dccw.exealso on your PC monitor

Drag your favorite applications in the taskbar

Avast! antiVirus

Avast! FREE ANTI-VIRUS is a reliable antivirus software solution designed to provide computer users with effective protection against viruses and spyware.


New Features in 7.0 Beta:

  • UI facelift
  • FileRep service (cloud based)
  • Streaming updates
  • Sandbox & Autosandbox improvements
  • Browser protection improvements
  • Remote assistance feature to help your friends
  • Support tool
  • Export/Import settings
  • Screensaver facelift
  • Runs on Win8 Developer Preview
  • Security improvements

o run avast! Free Antivirus your PC must meet the following criteria.

Operating Systems Supported

  • Windows 7 (any Edition, 32-bit or 64-bit)
  • Windows Vista (any Edition excl. Starter Edition, 32-bit or 64-bit)
  • Windows xp or higher (any Edition, 32-bit or 64-bit)
  • Microsoft Windows 2000 Professional Service Pack 4

Minimum Hardware Requirements

  • Pentium 3 Processor
  • 128 MB RAM
  • 200 MB of free hard disk space
Please note that avast! Free Antivirus runs only on PCs with Windows 2000 Professional Service Pack 4 and newer.
Please also note that avast! will not run properly if you have other antivirus software on your PC.

    Minimum Hardware Requirements:

    • Pentium 3 Processor
    • 128 MB RAM
    • 200 MB of free hard disk space
    download it from official website ===> http://goo.gl/9u6lh

    and for product key ===> http://goo.gl/1Fhw9

    source source : alltrickszone.in

    Angry Birds Space Transformation Pack For Windows 7

    Angry birds is the most popular video game to be played on the computers as well as mobile phones. We had shared many of the stuffs regarding this game like Angry birds full version Angry birds on the webpageAngry birds space free download. But now in the next step for the Angry Birds, we are going to introduce you with the Angry Birds Space transformation pack for windows 7
    This is a transformation which will change your Windows 7 fully into the Angry Birds Space. This includes its own Angry Birds themes, Icons, Cursor, Boot Screen, Sounds, Start ORB, Logon screen, Doc, Wallpapers and many more things which experiences you with the Angry Bird's world. 

    download installer from ===> http://goo.gl/TpCqR

    Source : alltrickszone.in